Knowledge Base • பயனர் வழிகாட்டி

EverPOS User Guide & Documentation

Complete step-by-step instructions with high-resolution software screenshots. Master cashier billing, multi-branch stock transfers, offline mode, and ZKTeco biometric attendance.
(காசாளர் பில்லிங், ஸ்டாக் பரிமாற்றம் மற்றும் பயோமெட்ரிக் இணைப்புக்கான எளிய தமிழ் & ஆங்கில விளக்கம்)

Download Official PDF Script
Module 1 High-Speed Checkout

1. High-Speed Cashier POS Billing Flow

காசாளர் பில்லிங் மற்றும் விற்பனை செய்யும் வழிமுறைகள்
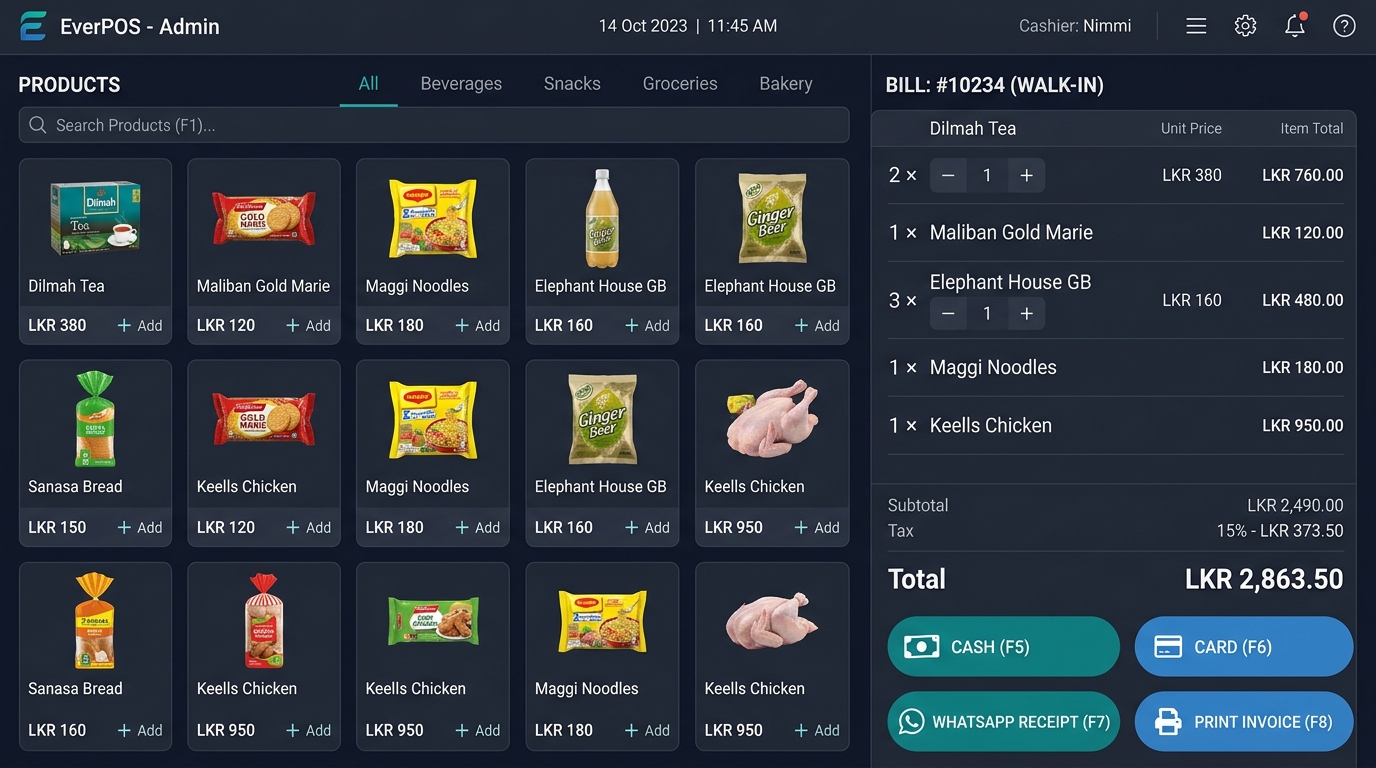
EverPOS Cashier Billing Interface Screenshot
Figure 1: EverPOS Cashier Interface with barcode scanning, LKR currency, and instant action keys. Active POS Terminal

Step 1: Open Register & Float (ஆரம்ப பண இருப்பு பதிவு செய்தல்)

At the start of each cashier shift, navigate to POS → Open Register. Enter the opening physical cash amount (Float) kept in the drawer for customer change. Click Open Register.
ஒவ்வொரு நாளும் கடையை திறக்கும் போது, அல்லது காசாளர் மாறும் போது — POS → Open Register சென்று, சில்லறை பணப் பெட்டியில் (Cash Drawer) வைக்கப்படும் ஆரம்ப பணத் தொகையை (Opening Float) உள்ளிட்டு Open Register என்பதை கிளிக் செய்யவும்.

Step 2: Product Addition & Barcode Laser Scanning (பார்கோட் ஸ்கேனிங்)

Aim the laser barcode scanner at the product barcode. The item, price in LKR, and default quantity (1) will instantly appear in the active cart in sub-second speed. Press + or - to adjust quantities, or type item name in the search box (Hotkey: F1).
பொருளில் உள்ள பார்கோட்டை ஸ்கேனர் மூலம் ஸ்கேன் செய்தவுடன், பொருளின் பெயர், விலை (LKR) மற்றும் அளவு தானாகவே வலதுபுற பில்லில் சேர்க்கப்படும். அளவை கூட்ட அல்லது குறைக்க + / - பட்டனை அழுத்தலாம். பார்கோட் இல்லாத பொருட்களை தேட F1 கீயை அழுத்தவும்.

Step 3: Payment Settlement & WhatsApp Receipt (பணம் செலுத்துதல் & WhatsApp ரசீது)

Select the payment method:
  • CASH (F5): Enter received cash; change return is calculated automatically and cash drawer kicks open.
  • CARD (F6): Credit / Debit card swipe or QR pay.
  • WHATSAPP RECEIPT (F7): Dispatches itemized PDF receipt directly to the customer's WhatsApp number.
  • PRINT INVOICE (F8): Thermal 80mm receipt prints out instantly.
வாடிக்கையாளர் பணம் செலுத்தும் முறையை தேர்ந்தெடுக்கவும்:
  • CASH (F5): பெற்ற தொகையை உள்ளிட்டால், மீதி தொகை தானாக கணக்கிடப்பட்டு கேஷ் டிராயர் திறக்கும்.
  • CARD (F6): கிரெடிட் / டெபிட் கார்டு அல்லது QR பேமென்ட்.
  • WHATSAPP RECEIPT (F7): வாடிக்கையாளரின் WhatsApp எண்ணிற்கு டிஜிட்டல் ரசீதை உடனே அனுப்பும்.
  • PRINT INVOICE (F8): தெர்மல் பிரின்டரில் ரசீது அச்சிடப்படும்.
Module 2 Cloud Multi-Location

2. Multi-Branch Inventory & Stock Transfer

கிளைகளுக்கு இடையிலான நேரடி ஸ்டாக் கண்காணிப்பு மற்றும் பரிமாற்றம்

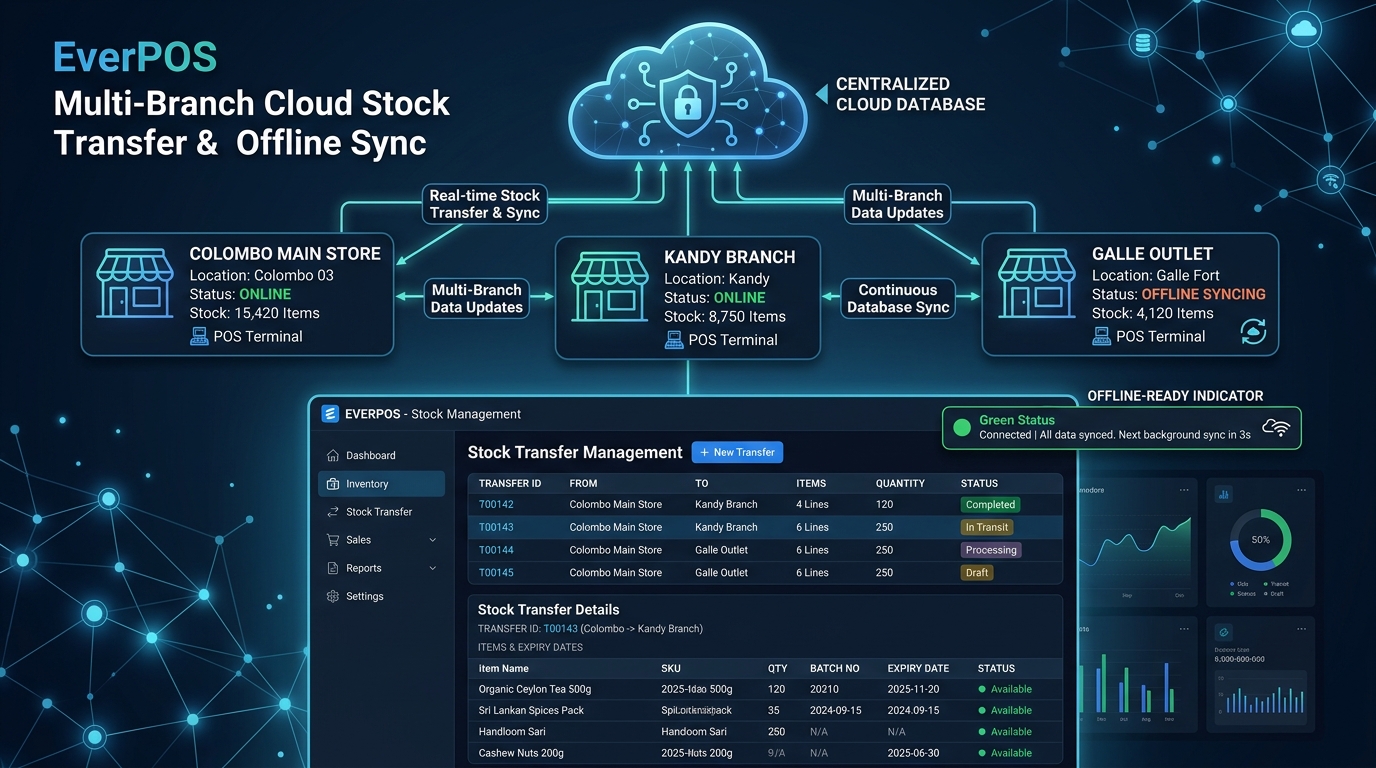
Multi-Branch Cloud Stock Transfer Diagram and Screen
Figure 2: Centralized Cloud sync connecting Colombo, Kandy, and Galle branches with batch expiry tracking. Multi-Branch Cloud

Live Stock Monitoring & Transfer Requisitions (ஸ்டாக் மாற்றுதல்)

1. Go to Stock Transfers → Add Transfer.
2. Select Location (From) e.g. Colombo Main Store, and Location (To) e.g. Kandy Branch.
3. Add products, specify quantities, and select batch numbers (with expiry dates).
4. Set Status to In Transit while delivery vehicle is on route, and mark Completed upon warehouse receipt.
1. Stock Transfers → Add Transfer பகுதிக்கு செல்லவும்.
2. பொருட்கள் புறப்படும் கிளை (From) எ.கா. Colombo Main Store மற்றும் சேர வேண்டிய கிளை (To) எ.கா. Kandy Branch ஆகியவற்றை தேர்ந்தெடுக்கவும்.
3. அனுப்பப்படும் பொருட்களின் அளவுகள் மற்றும் Batch / Expiry Date-ஐ உள்ளிடவும்.
4. பொருட்கள் லொறியில் செல்லும் போது In Transit என்றும், கிளைக்கு சென்று சேர்ந்ததும் Completed என்றும் மாற்றவும்.
Module 3 Zero Downtime

3. Offline-First Billing Engine

இணையம் (Internet) துண்டிக்கப்பட்டாலும் தடையின்றி பில்லிங் செய்யும் முறை

EverPOS is built with a dual-layer local caching database. When Dialog, Mobitel, SLT Fiber, or electricity router fails:
  • The counter terminal displays a yellow "Offline Billing Active" badge.
  • Cashiers can continue scanning, printing receipts, and completing sales without any lag.
  • When internet connectivity is restored, the synchronization engine automatically pushes all buffered invoices to the central cloud server.
இலங்கையின் இன்டர்நெட் துண்டிப்புகளை தாங்கும் வகையில் EverPOS-ல் Offline-First Engine உள்ளது:
  • Dialog, Mobitel அல்லது Fiber இணைப்பு துண்டிக்கப்பட்டாலும், பில்லிங் ஸ்கிரீனில் மஞ்சள் நிறத்தில் "Offline Active" என்று தோன்றும்.
  • காசாளர் எந்தவித தடையுமின்றி தொடர்ச்சியாக பொருட்களை ஸ்கேன் செய்து ரசீது பிரிண்ட் செய்யலாம்.
  • இணையம் மீண்டும் வந்தவுடன், போடப்பட்ட அனைத்து பில்களும் தானாகவே பிரதான கிளவுட்டுடன் (Cloud) இணைக்கப்பட்டு சிங்க் ஆகிவிடும்!
Module 4 HRM Automation

4. ZKTeco Biometric Time & Attendance Setup

ZKTeco விரலடையாள & முக அடையாள மெஷின் இணைப்பு வழிகாட்டி

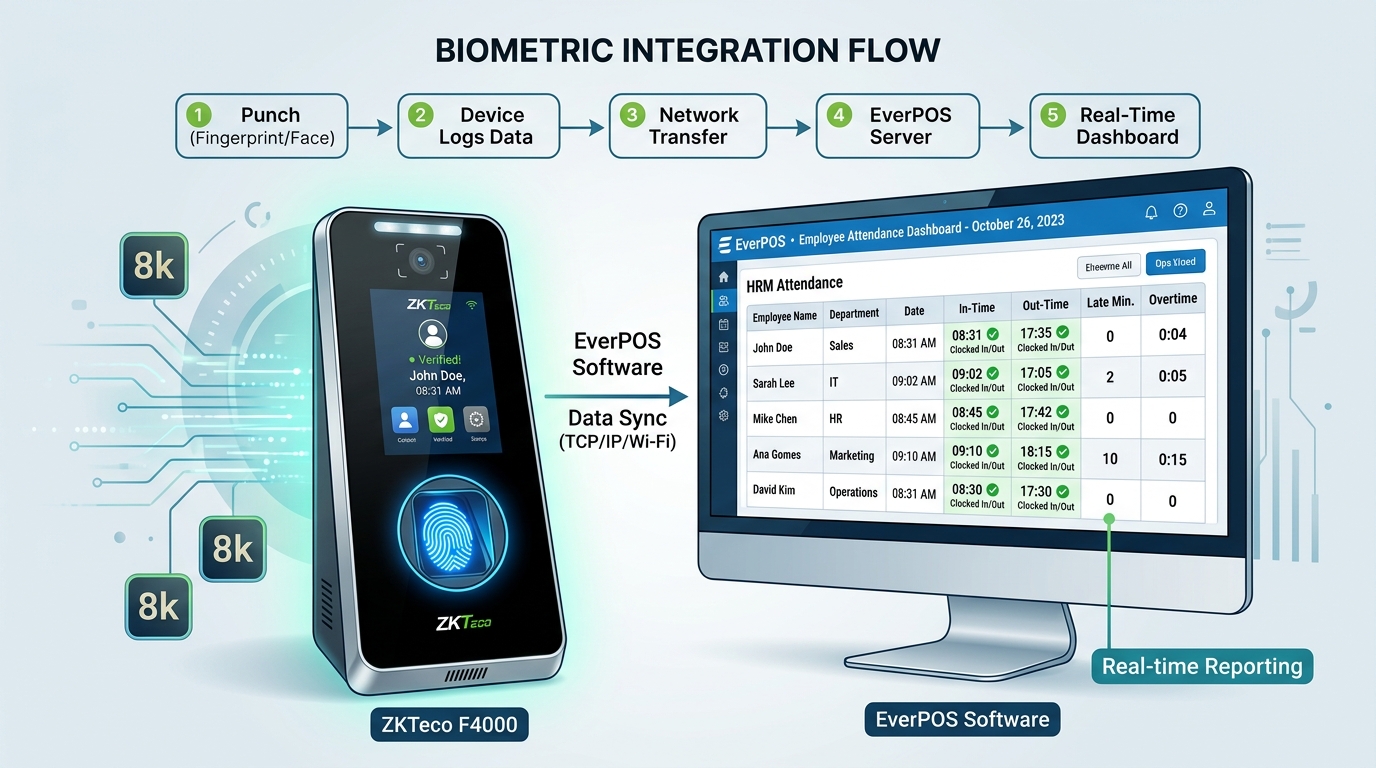
ZKTeco Biometric Integration Flow and Screen
Figure 3: Biometric Punch Flow syncing staff punches into EverPOS HRM with In/Out and Overtime. ZKTeco ADMS Cloud

Machine Configuration (மெஷினில் செய்ய வேண்டிய அமைப்புகள்)

1. In your ZKTeco Terminal, enter Menu → Comm. → Cloud Server / ADMS.
2. Set Server Address: your-cloud-ip-or-domain and Server Port: 80 or 443.
3. Enable Domain Name Mode: Yes.
4. In EverPOS, navigate to Biometric / ZKTeco → Staff ID Mapping to match the device Employee ID with your staff user accounts.
1. ZKTeco மெஷினில் Menu → Comm. → Cloud Server / ADMS பகுதிக்கு செல்லவும்.
2. Server Address: உங்கள் EverPOS சர்வர் ஐபி அல்லது டொமைனை உள்ளிடவும்.
3. Server Port: 80 (அல்லது SSL-க்கு 443) என மாற்றவும்.
4. EverPOS மென்பொருளில் Biometric / ZKTeco → Staff ID Mapping சென்று ஊழியரின் Device ID-ஐ இணைக்கவும்.
Module 5 Daily Settlement

5. End-of-Day Settlement & WhatsApp Report

நாளின் முடிவில் கணக்கு சரிபார்த்தல் மற்றும் WhatsApp விற்பனை அறிக்கை

1. At store closing, click Close Register in the top header bar.
2. Count the physical cash notes and card slips in the drawer. Enter the counted amounts into the settlement table.
3. Any cash difference (Short / Excess) is calculated automatically.
4. Click Close & Send WhatsApp EOD. The complete day's sales summary (Total Sales, Cash, Card, Tax, Expenses) is instantly dispatched to the business owner's smartphone.
1. நாளின் முடிவில் கடையை மூடும் போது, மேல் பகுதியில் உள்ள Close Register-ஐ கிளிக் செய்யவும்.
2. பெட்டியில் உள்ள பணத்தை எண்ணி, மொத்த தொகையை பதிவிடவும்.
3. கணக்கில் உள்ள தொகையும், கையில் உள்ள பணமும் சரியாக உள்ளதா என்பதை சிஸ்டம் தானாக சரிபார்க்கும் (Cash Difference).
4. Close & Send WhatsApp EOD-ஐ கிளிக் செய்தவுடன், அன்றைய நாளின் முழு விற்பனை விபரமும் (மொத்த விற்பனை, ரொக்கம், கார்டு, செலவுகள்) கடை உரிமையாளரின் WhatsApp எண்ணிற்கு உடனடியாக அனுப்பப்படும்.